![[object Object]](/_next/image?url=https%3A%2F%2Fcdn.sanity.io%2Fimages%2Fei1axngy%2Fproduction%2Fd192001e06ed413fb0e091ac51bca29248130453-942x942.jpg&w=256&q=75)
by Dr Ana Rojo-Echeburúa
Updated 14 December 2023
Completing our AI Data Assistant with Custom Knowledge using a Pinecone Vector Database
![[object Object]](/_next/image?url=https%3A%2F%2Fcdn.sanity.io%2Fimages%2Fei1axngy%2Fproduction%2Fdb49674734d543eff77511ce4048982d2ed66279-800x370.jpg&w=2048&q=75)
Download the resources for this post here.
Over the past decade, chatbots have emerged as a powerful asset for businesses, organisations, and users, enhancing communication and boosting productivity. Whether it involves handling customer service inquiries or crafting captivating interactive experiences, these AI-powered platforms are transforming the landscape of information retrieval.
In this last part of our series Building an AI Data Assistant with Streamlit, LangChain and OpenAI we are delving into the creation of a chatbox, taking our AI assistant to new heights and further enhancing the user experience of our application.
✨ Remember that what you learn in this tutorial can be applied to your own business problems.
While we’ll focus on one specific use case, you can easily adapt these techniques to your unique needs and goals!
🔗 We will be using our own generated information based on this use case.
🧠 Key learnings
We will first lay the groundwork for our AI Assistant. We'll import the essential packages and modules required for our coding environment, ensuring a robust foundation.
Our AI Assistant will thrive on a robust knowledge base. We will use LangChain to efficiently load documents from a specified directory. These documents will then undergo a transformation, breaking into manageable chunks and evolving into embeddings.
Pinecone, our vector database service, will seamlessly come into play, storing and retrieving these embeddings.
We will continue enhancing the user experience using Streamlit. Two distinct tabs will be created —one dedicated to data analysis and science, and the other hosting the chatbox functionality. A welcome will set the stage for an interactive and user-friendly experience.
In order to make sure that our chatbox handles queries effectively, we are going to create some auxiliary functions.
We will initialise a Chat OpenAI model and set up a conversation chain to manage the chatbot's workflow.
Containers in Streamlit will become our canvas, elegantly displaying the conversation. Users will input queries, and the chatbot will handle responses, refined queries, and contextual matches.
Your AI Assistant it is going to level up, all set to chat and help you out with your data science problems!
We are going to dive into the concept of indexes and memory in the LangChain framework. We will be creating a chabox that can answer not only queries from documents but also follow-up questions from the user, ensuring a seamless and interactive user experience.
🗂️ Indexes
Indexing stands as a pivotal element within LangChain. It entails structuring documents in a manner that allows LLMs to engage with them efficiently. In this tutorial, we will be working with Document Loaders, Text Splitters and Vector Stores.
▪️Document Loaders
A Document Loader in LangChain is a tool responsible for loading documents from different sources and handling various data formats, including PDFs, and converting them into a standard structure that can be processed.
In this tutroial, we will be using the class DirectoryLoad, a document loader can load multiple documents from a given directory.
▪️ Text Splitters
Text Splitters are integral components responsible for breaking down larger text documents into smaller, more manageable segments. This functionality significantly enhances the efficiency of LLMs in processing inputs.
Particularly beneficial when dealing with extensive documents, Text Splitters simplify the analysis process for LLMs and facilitate relevant responses. The choice of a Text Splitter depends on the specific model requirements and data nature, with considerations such as sentence or paragraph-level segmentation.
::: info
In this tutorial, we will be using a RecursiveCharacterTextSplitter, which employs recursion as the core mechanism to accomplish text splitting. We will set it with specific chunk size and overlap values to achieve optimal text splitting.
:::
▪️ Vector Stores
Vector Stores are specialised databases designed to store high-dimensional embedding representations of diverse data types, including text, images, and more. These stores are used for vector search, which involves finding similar vectors based on their distance in the vector space. LangChain provides tools for storing and querying similar vectors, and it offers observability features to monitor the behaviour of vector stores, including tracking latency, queries, the number of documents retrieved, and the content of the documents.
LangChain supports integration with various vector databases, such as , which we will be using in this video.
We will also be using SentenceTransformerEmbeddings. This allows us to compute text embeddings, which can then be compared using cosine-similarity to find sentences with similar meanings. The model that we will be using, all-MiniLM-L6-v2 maps sentences and paragraphs to a 384-dimensional dense vector space.
💭 Memory
Conversational Memory serves as the backbone for enabling chatbots to respond coherently to multiple queries in a conversational manner. It ensures a seamless dialogue, preventing each query from being treated as an isolated input devoid of context from prior interactions.
This memory feature allows a LLM to retain information about past exchanges with the user. By default, LLMs operate in a stateless manner, processing each incoming query independently without considering the broader conversation context.
Implementing conversational memory revolves around the ConversationChain. Numerous types of conversational memory can be utilised with the ConversationChain. One such implementation is the ConversationBufferMemory, which we will be using in this tutorial.
The ConversationBufferMemory is a method in LangChain, involving passing the raw input of past conversations between humans and AI directly to the {history} parameter.
This approach has its pros and cons:
Pros:
- Storing everything provides the LLM with the maximum amount of information.
- Storing everything is simple and intuitive.
Cons:
- Storing more tokens can lead to slower response times and higher costs.
- Long conversations may face limitations as they approach the LLM token limit (e.g., 4096 tokens for
text-davinci-003andgpt-3.5-turbo).
The ConversationBufferMemory serves as an excellent starting point, offering simplicity but with the limitation of storing every interaction.
📦 Importing the required packages and modules
First thing we need to do is set up our environment with the necessary libraries and tools. This ensures that our code can execute as expected. The requirements.txt file contains a list of packages and modules required for this project. To install all of these, you can run the following command in your terminal:
pip install -r requirements.txt
This command tells pip, which is the Python's package installer, to install the libraries that are contained in the requirements.txt file.
With our environment set up, we can now proceed to the next step: indexing our documents in Pinecone.
📄 Document Indexing - Document Loader
The next step in order to build the chatbot is to index the documents that our chatbot will use to answer queries. We are going to create a Jupyter Notebook in order to load everything into Pinecone using LangChain.
For that, we first need to load the documents from our directory. We are going to use the DirectoryLoader class provided by LangChain to achieve this. This class accepts a directory as input and loads all the documents that are in it.
For this specific project, we have created two files that live in a folder called data in our directory:
- Elon.txt: a plain text file containing information about Elon Musk.
- twitter.pdf: a PDF file with information about the Twitter Stock Market.
You can customise this project by uploading your own documents. They can be in various formats such as CSV, JSON, HTML, PPT, and more.
from langchain.document_loaders import DirectoryLoader

directory = '/content/data'

def load_docs(directory):
    loader = DirectoryLoader(directory)
    documents = loader.load()
    return documents

documents = load_docs(directory)
len(documents)
✂️ Document Indexing - Text Splitter
After loading the documents, we need to split these documents into smaller chunks. We need to make sure that the size of the documents is manageable and that no important information is missed out due to the splitting. We are going to use a size chunk of 500 and a chunk overlap of 20. In order to do this, we need to import RecursiveCharacterTextSplitter from LangChain. We are also going to print how many chunks we have created.
from langchain.text_splitter import RecursiveCharacterTextSplitter

def split_docs(documents,chunk_size=500,chunk_overlap=20):
  text_splitter = RecursiveCharacterTextSplitter(chunk_size=chunk_size, chunk_overlap=chunk_overlap)
  docs = text_splitter.split_documents(documents)
  return docs

docs = split_docs(documents)
print(len(docs))
🛏️ Document Indexing - Creating Embeddings
After the documents are split, our next step involves transforming these text chunks into a format understandable to our LLM. This is where the embeddings come to play. We can use SentenceTransformerEmbeddings from LangChain to achieve this. We will be using the all-MiniLM-L6-v2 model.
from langchain.embeddings import SentenceTransformerEmbeddings
embeddings = SentenceTransformerEmbeddings(model_name="all-MiniLM-L6-v2")
🌲 Document Indexing - Creating a Pinecone Account and Setting and Index
After the embeddings are created, they need to be stored in a place from where they can be easily accessed and searched. Pinecone is a vector database service that is perfect for this task.
We are going to create a Pinecone account and set our index.
To create an index in Pinecone for an embedding of length 384 we need to:
- Log in to the Pinecone console after creating our account.
- Click on "Create Index".
- Name your index. For this project we are going to call it
ai-assistant. - Configure the index to use 384 dimensions.
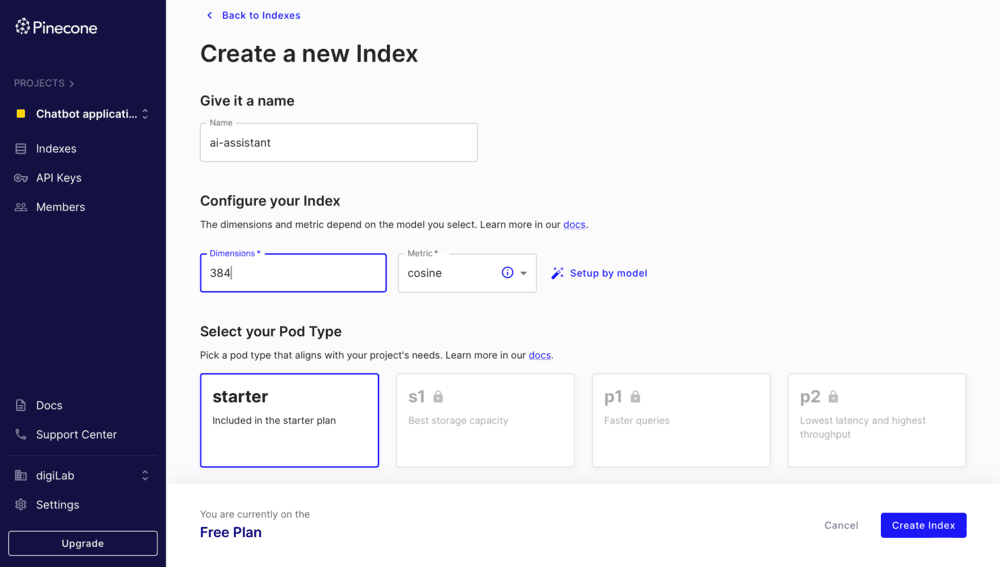
Figure 1. PineCone Set Up
We need to make sure that the dimension of the index matches the model's embedding dimension, as the dimension of an index cannot be changed after creation.
Once the index is created, we can proceed to load data and perform queries using the created index.
Document Indexing - Storing Embeddings into Pinecone
Once the index is set up, we can store our embeddings in Pinecone using the pinecone class from LangChain.
import pinecone
from langchain.vectorstores import Pinecone
pinecone.init(
    api_key="",
    environment="gcp-starter"
)
index_name = "langchain-chatbot"
index = Pinecone.from_documents(docs, embeddings, index_name=index_name)
You will need to add your api key and your environment which you can find under the API keys tab in your Pinecone account.
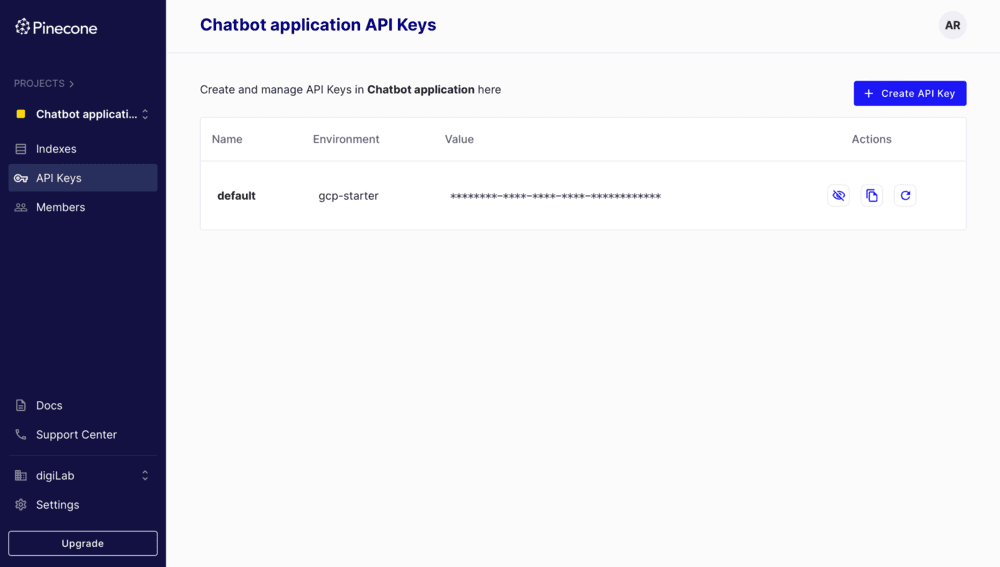
Figure 2. PineCone API
🔎 Document Indexing - Similarity Search
The embeddings can then be accessed and searched using the similarity_searchfunction provided by the pinecone class.
def get_similiar_docs(query,k=1,score=False):
  if score:
    similar_docs = index.similarity_search_with_score(query,k=k)
  else:
    similar_docs = index.similarity_search(query,k=k)
  return similar_docs
We can check how this function work using this piece of code:
query = "Who took over Twitter"
similar_docs = get_similiar_docs(query)
print(similar_docs)
This completes the process of document indexing, and we are now ready to move to the application!
📂 Enhancing User Experience - Adding Tabs
To elevate the user experience, we're introducing two tabs to our AI Assistant. One tab will focus on data analysis and data science, while the other will house our chatbox functionality. Using Streamlit's st.tabs, we can seamlessly implement this feature:
tab1, tab2 = st.tabs(["Data Analysis and Data Science", "ChatBox"])

with tab1:
    # Insert code from previous sections related to data analysis and data science

with tab2:
    # Insert new code for the ChatBox functionality
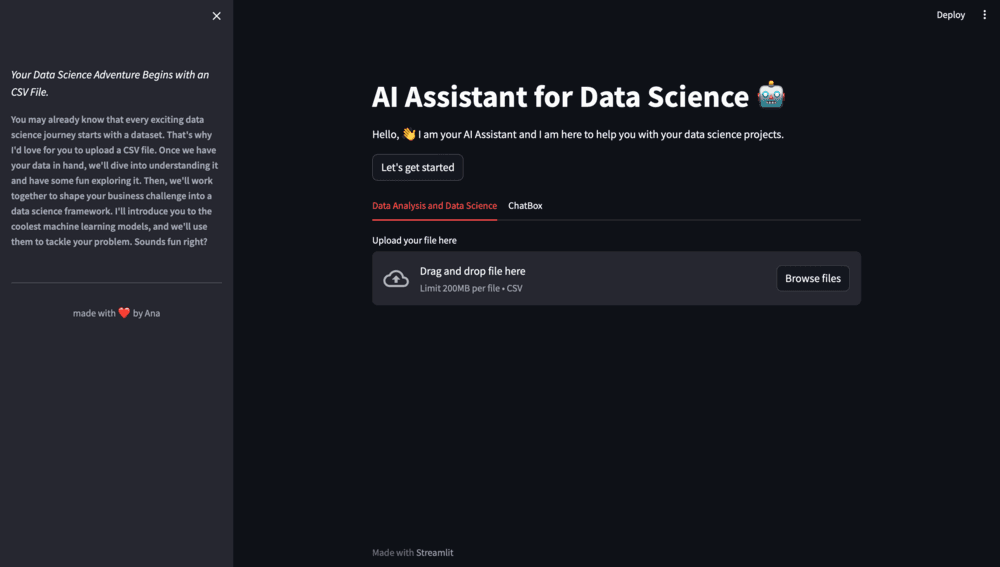
Figure 3. Tabs
In addition, we'll provide a welcoming header and an introductory message, creating a friendly space for users:
st.write("🤖 Welcome to the AI Assistant ChatBox!")
st.write("Got burning questions about your data science problem or need help navigating the intricacies of your project? You're in the right place! Our chatbot is geared up to assist you with insights, advice, and solutions. Just type in your queries, and let's unravel the mysteries of your data together! 🔍💻")

# Adding a blank space for visual separation
st.write("")
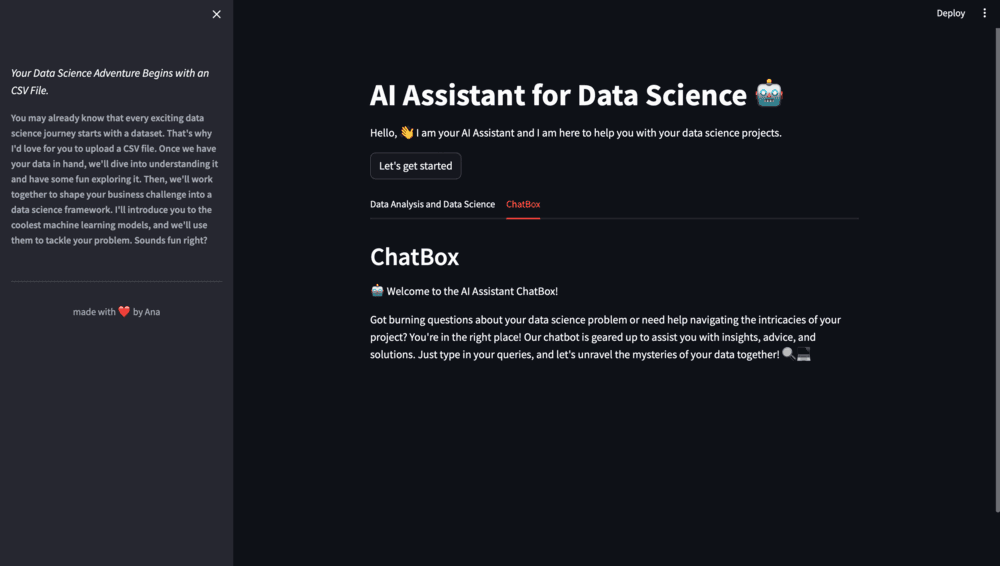
Figure 4. Tabs Chatbox
This setup not only segregates the two main functionalities into distinct tabs but also offers a warm welcome and guidance for users engaging with the AI Assistant.
Auxiliary Functions for our ChatBox - Set Up
We need to ensure that our chatbox can effectively process user queries and find relevant responses. For that, we are going to create a separate script for our auxiliary functions that we will call conversation.py.
Before we start writing this functions there are a couple of things we need to set up:
- Required libraries and packages
- Our OpenAI API key
- Our sentence transformer model
- Initialise Pinecone
- Load our index
from sentence_transformers import SentenceTransformer
import pinecone
import openai
import streamlit as st

openai.api_key = ""
model = SentenceTransformer('all-MiniLM-L6-v2')

pinecone.init(api_key='', environment='gcp-starter')
index = pinecone.Index('ai-assistant')
You would need to add here both your OpenAI API key and your Pinecone API key.
🧚🏼 Auxiliary Functions for our ChatBox - Finding Matches
The purpose of the find_match function is to identify the most relevant documents corresponding to a user's query. Using the Pinecone vector index, the function retrieves matches and provides the most relevant textual content in response.
def find_match(input):
    input_em = model.encode(input).tolist()
    result = index.query(input_em, top_k=2, includeMetadata=True)
    return result['matches'][0]['metadata']['text']+"\n"+result['matches'][1]['metadata']['text']
🧙🏻 Auxiliary Functions for our ChatBox - Refining Queries
The query_refiner function serves to enhance the user's query, ensuring it is well-suited for delivering a relevant response. It achieves this by employing OpenAI's DaVinci model to refine the query in alignment with the ongoing conversation log.
def query_refiner(conversation, query):
    response = openai.Completion.create(
    model="text-davinci-003",
    prompt=f"Given the following user query and conversation log, formulate a question that would be the most relevant to provide the user with an answer from a knowledge base.\n\nCONVERSATION LOG: \n{conversation}\n\nQuery: {query}\n\nRefined Query:",
    temperature=0.7,
    max_tokens=256,
    top_p=1,
    frequency_penalty=0,
    presence_penalty=0
    )
    return response['choices'][0]['text']
🪮 Auxiliary Functions for our ChatBox - Tracking the Conversation
The role of the get_conversation_string function is to maintain a record of the ongoing conversation. It creates a string representation of the conversation log, encompassing both the user's queries and the responses provided by the chatbox.
def get_conversation_string():
    conversation_string = ""
    for i in range(len(st.session_state['responses'])-1):
        conversation_string += "Human: "+st.session_state['requests'][i] + "\n"
        conversation_string += "Bot: "+ st.session_state['responses'][i+1] + "\n"
    return conversation_string
These auxiliary functions empower the chatbot to not just produce responses but also enhance user queries and pinpoint the most relevant answers. This results in a more effective and user-friendly chatbot experience.
Building the Chatbot Application with Streamlit - Set Up
Now, we proceed to construct the chatbot application itself. Using Streamlit, we craft a seamless and interactive interface for the chatbot. This entails building a user-friendly interface and enabling the chatbot to handle queries and deliver responses effectively.
First, we need to iport the required libraries and modules:
from langchain.chat_models import ChatOpenAI
from langchain.chains import ConversationChain
from langchain.chains.conversation.memory import ConversationBufferWindowMemory
from langchain.prompts import (
    SystemMessagePromptTemplate,
    HumanMessagePromptTemplate,
    ChatPromptTemplate,
    MessagesPlaceholder
)

from streamlit_chat import message
from conversation import *
Building the Chatbot Application with Streamlit - Session State
In order to make sure that the chatbox works in order as expected, we need to use session state to initialise two lists. One is the 'responses' and the other is the 'requests'.These lists are going to store the history of bot responses and user requests respectively.
if 'responses' not in st.session_state:
    st.session_state['responses'] = ["How can I assist you?"]

if 'requests' not in st.session_state:
    st.session_state['requests'] = []
We discussed session state in Part1, so feel free to revisit it if you need a refresher!"
🐉 Building the Chatbot Application with Streamlit - Initialising the LLM
We then create an instance of ChatOpenAI, which utilises the gpt-3.5-turbo model from OpenAI for language understanding and generation.
llm = ChatOpenAI(model_name="gpt-3.5-turbo", openai_api_key=apikey)
💬 Building the Chatbot Application with Streamlit - Conversation Buffer Memory
Now we are going to enable our ChatBox with memory. This memory structure is instantiated with a size of 3, meaning that our chatbot would remember the last three interactions, keeping a manageable memory size for efficiency.
if 'buffer_memory' not in st.session_state:
    st.session_state.buffer_memory=ConversationBufferWindowMemory(k=3,return_messages=True)
🗒️ Building the Chatbot Application with Streamlit - Prompt Templates
LangChain provides different types of MessagePromptTemplate for creating different types of messages. For our chatbox, we are going to use three of them: SystemMessagePromptTemplate, HumanMessagePromptTemplateand ChatPromptTemplate.
system_msg_template = SystemMessagePromptTemplate.from_template(template="""Answer the question as truthfully as possible using the provided context,
and if the answer is not contained within the text below, say 'I don't know'""")
human_msg_template = HumanMessagePromptTemplate.from_template(template="{input}")
prompt_template = ChatPromptTemplate.from_messages([system_msg_template, MessagesPlaceholder(variable_name="history"), human_msg_template])
⛓️ Building the Chatbot Application with Streamlit - Conversation Chain
Now we set up the ConversationChain using the memory, prompt template, and LLM we've set up. The ConversationChain is essentially a workflow of how our chatbot would operate: it uses user input, prompt template formatting, and the LLM to conduct an interactive chat.
conversation = ConversationChain(memory=st.session_state.buffer_memory, prompt=prompt_template, llm=llm, verbose=True)
👥 Building the Chatbot Application with Streamlit - Creating the User Interface
In order to display the conversation in a user friendly and interactive manner, we are going to use the st.container and st.text_input functions from Streamlit.
response_container = st.container()
textcontainer = st.container()
⚡ Building the Chatbot Application with Streamlit - Generating Responses
When the user inputs a query, the chatbot uses the predict method to generate a response. The response is then displayed in the chat interface.
with textcontainer:
    query = st.text_input("Hello! How can I help you? ", key="input")
    if query:
    with st.spinner("thinking..."):
        conversation_string = get_conversation_string()
        refined_query = query_refiner(conversation_string, query)
        st.subheader("Refined Query:")
        st.write(refined_query)
        context = find_match(refined_query)
        response = conversation.predict(input=f"Context:\n {context} \n\n Query:\n{query}")
        st.session_state.requests.append(query)
        st.session_state.responses.append(response)
with response_container:
    if st.session_state['responses']:
        for i in range(len(st.session_state['responses'])):
message(st.session_state['responses'][i],key=str(i))
    if i < len(st.session_state['requests']):
message(st.session_state["requests"][i], is_user=True,key=str(i)+ '_user')
Figure 5. Chatbox1

Figure 6. Chatbox2
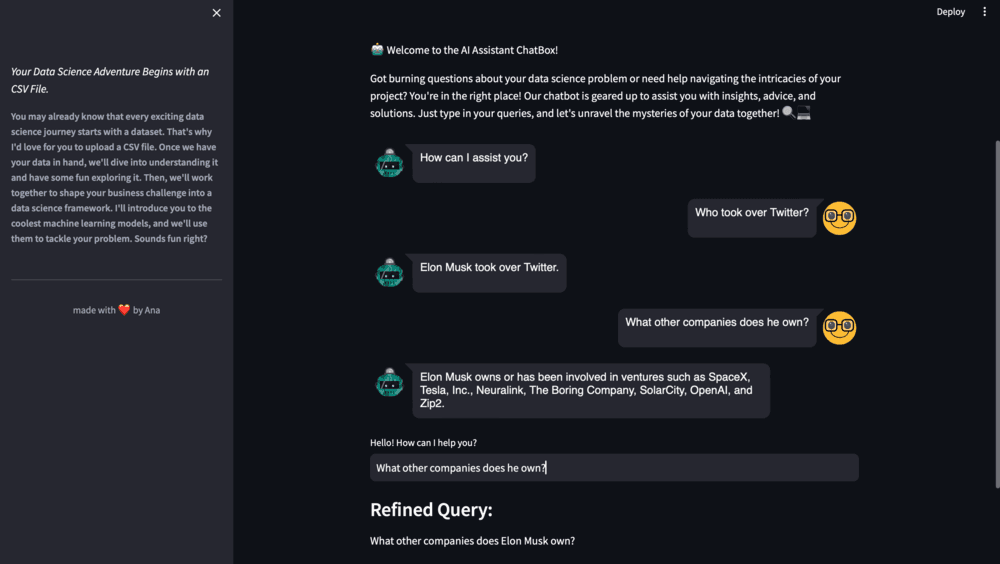
Figure 7. Chatbox13
And there you have it. We've reached the end of our series!
By now, you've transformed your AI Assistant into a powerful ally, ready to tackle the complexities of your projects. The journey doesn't end here, though – the real magic happens when you implement what you've learned to your own projects.
Remember that you can customise your AI assistant to your own data, goals, and needs. Try loading different types of documents, use your own databases, and play with other models and parameters.
🤖 Resources
The complete code, requirements.txt file and other resources can be downloaded from the resource panel at the top of this article.
Thank you for joining me on this journey. I'm looking forward to seeing you on our next adventure. Until then, happy coding, and goodbye. 👱🏻♀️
Featured Posts
If you found this post helpful, you might enjoy some of these other news updates.
Python In Excel, What Impact Will It Have?
Exploring the likely uses and limitations of Python in Excel

Richard Warburton
Large Scale Uncertainty Quantification
Large Scale Uncertainty Quantification: UM-Bridge makes it easy!

Dr Mikkel Lykkegaard
Expanding our AI Data Assistant to use Prompt Templates and Chains
Part 2 - Using prompt templates, chains and tools to supercharge our assistant's capabilities

Dr Ana Rojo-Echeburúa